Easy Stuffed Zucchini

IMG_5446With zucchini busting from every corner of the garden (and the grocery store) it’s hard for me not to think about zucchini bread. I sure love my carbs and what sounds healthier than vegetable filled carbs!? But I can only make zucchini bread so many times in one week, and can I really feed just bread to my hubs for dinner? The funny thing is I probably could and he would love it!

Fortunately zucchini is a great base for many dishes. One of my favorite is stuffed zucchini.

Here is my version of stuffed zucchini. There are so many ways to make this dish but this is how I usually do it. Feel free to get creative and use what you have on hand.

Ingredients

4 zucchinis
1 cup of cooked qunioa
1 onion, chopped
1/2 large tomato, chopped
2 garlic cloves, minced
1/2 teaspoon oregano
1/4 teaspoon cumin
1/4 teaspoon garlic powder
1/8 teaspoon sea salt
1/8 teaspoon pepper
Add any other spices you like
1/4 cup black olives, sliced or chopped
1/2 cup cheese grated, I used half extra sharp cheddar and half mozzarella

Directions

Preheat oven to 400 degrees F.

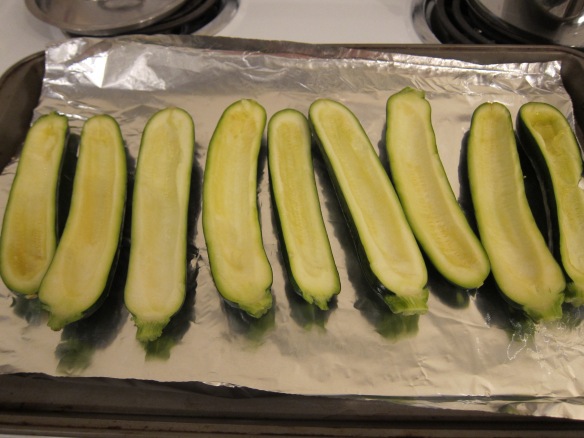
Wash the zucchini. Slice them in half length-ways. I leave the ends on, makes for less chopping!

Spoon out the insides (leave about 1/2 an inch in) until you end up with boat like shells.

Now give the zucchini pulp a good chop, also chop a small onion and 1/2 a tomato while you’re at it.

IMG_5424

In a pan heat olive oil on med. Add the onion and garlic for about 3 minutes. When onion is fragrant and translucent add the tomato and seasonings. Cook another 2-3 minutes.

IMG_5425

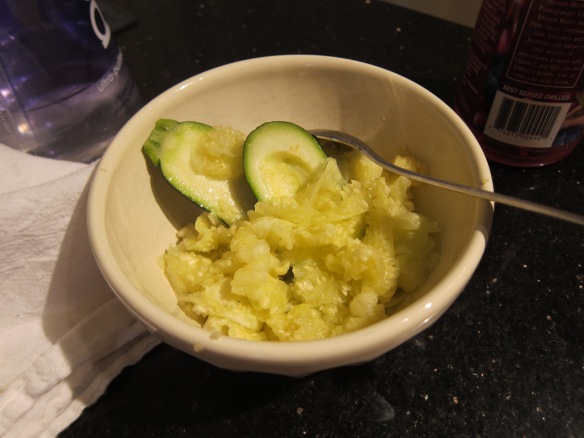
Transfer the cooked onion/garlic/tomato mixture to a large bowl. Add the zucchini pulp and olives, then mix together with the cooked quinoa.

Line a baking pan with tin foil or parchment paper. Put the zucchini boats in. Grab a spoon and fill the shells with the mix. Sprinkle some cheese on top.They’re best served straight out of the oven.

Cook about 20 minutes and then turn on the grill until the top is golden brown.

IMG_5428 IMG_5429
IMG_5447 IMG_5448 IMG_5449What’s your favorite ingredients for stuffed zucchini? Leave me a comment below!

Caitlin

What’s for Dinner – Agave Lime Chicken with Asparagus and Toasted Coconut Butter Cookies

At the start of each week I try to have my meal agenda for the week. Go shopping on Sunday evening and plan my meals for week.

Each Monday starts out well, I make exactly what I planned for the week. Delicious and ready to go once Matt gets home. By the end of the week however, things get a little less organized. Things come up; friends want to go out to dinner (we want to go out to dinner), working late, don’t feel like what I planned, etc.

This is why I have tried to become more flexible with my planning. I have been trying to plan by main dish and side dishes with lots of options for salads. This gives me the flexibility of deciding what main dish I want to make and what side dishes I feel like for each night. So far it has  been working well.

This week I found a great recipe on Elana’s Pantry website, Agave Lime Chicken. However, since I didn’t have a whole chicken I used chicken tenders that I had on hand.

Here is my version of Elana’s recipe.

Agave Lime Chicken
Ingredients
  • Chicken tenders or breasts (I used about 2 pounds of chicken tenders)
  • 1-3 tablespoons olive oil
  • ¼ cup agave nectar
  • Dash of celtic sea salt
  • 1 lime
  • Half a red onion, sliced
  • 4 cloves of fresh garlic
  • dash cumin dash chili powder
Directions
  1. Rinse the chicken and pat dry
  2. Place chicken in a baking dish
  3. Drizzle with olive oil and agave, then sprinkle with salt, cumin and chili powder
  4. Cut the lime into quarters, squeeze the juice from one quarter of the lime over the chicken and place the other quarters in the pan
  5. Cut the onions in half and place in the pan
  6. Leaving the skin on the garlic, break the head apart and scatter the cloves around the pan
  7. Bake at 350° for 15-20 minutes until inside temperature reaches 165 °F
  8. Remove chicken from oven and raise heat to 450°
  9. Remove chicken from oven
  10. Drizzle with pan juices and lime before serving
  11. Sauté the asparagus in a pan for about 8 mins with a dash of salt, pepper, onion and garlic powder. Serve along with chicken.
Serves 4

Now for dessert!

My pictures below DO NOT do these tasty little cookies justice.

They only take about 10 minutes to make and once they come out of the oven, you will hardly be able to keep your hands off them. I found the recipe on a new blog I found, Studio Cuisine.

Whip up a batch now and by the time your chicken is done cooking, you will be able to put these right into the oven. Enjoy!

Toasted Coconut Butter Cookies
Ingredients
  • 1/3 cup coconut flakes
  • 1 and 1/2 cups + 2 tbsp almond flour*
  • 1/8 tsp baking soda
  • 1/8 tsp sea salt
  • 5 (I used 4) tbsp butter, melted in saucepan over low heat
  • 1/4 cup agave nectar (or honey for SCD)
  • 1/2 tsp vanilla extract

Directions

  1. Preheat oven to 350 degrees F
  2. Spread coconut flakes out on baking sheet, and bake for 2-3 minutes until lightly toasted. Remove from oven.
  3. Mix almond flour, baking, soda, and sea salt in a medium-sized bowl.
  4. Combine melted butter, agave nectar, and vanilla extract.
  5. Add wet ingredients into dry and mix together.
  6. Fold in toasted coconut
  7. Roll dough into 1 inch balls, and place on parchment lined baking sheet.
  8. Bake for 10-15 minutes until golden brown.

Rosted Tomato Soup with Rosemary Cheddar Crackers

Fresh tomotoes are like precious jewels found at the end of summer when all else is wilting away.

Growing up on home-grown tomatoes have ruined me, or should I say, opened my eyes to the real taste of tomatoes. When I can not get tomatoes from my mom’s garden, I buy organic from the farmers market. I find that the “other” tomatoes don’t even taste like tomatoes; usually they taste somewhere between a sponge and an unripe watermelon (never thought of it that way did ya?).

Well, with a bundle of home-grown tomatoes from the last batch of the season, and a brisk evening breezing blowing through the house, I decided it was time to whip up one of my favorite soups, Roasted Tomato Soup and a side of Rosemary Cheddar Crackers.

Start with fresh ingredients….

…a bit of time…

…and bam! You can’t mess it up! Delicious, heart warming soup.


Now for the yummy homemade crackers.

(soup and cracker recipe below)

I started with Erica’s Almond Saltine Cracker recipe from a SCD (Specific Carbohydrate Diet) blog, Comfy Belly, a good starter recipe to add other ingredients.

Here is my version….

Perfect for dipping in your soup.

Rosemary Cheddar Cracker

Ingredients

  • 2 cups of blanched ground almond flour
  • 1/4 teaspoon of sea salt (almond flour tastes naturally salty to me, so I don’t add much salt)
  • 1 large egg
  • 1 tablespoon of olive oil (or butter)
  • 1/4 cup fresh, chopped rosemary
  • 1/2 cup grated organic cheddar cheese

Preparation

  1. Preheat oven to 350 degrees F.
  2. Combine the flour and salt in a bowl and blend well.
  3. Add the rosemary and cheese.
  4. Then add the egg and oil, and blend and shape the mixture into two balls of dough.
  5. Place each dough ball on a non-stick baking mat, then place a piece of parchment paper (or other non-stick mat) over the ball and roll the dough into a thin layer.
  6. Score the crackers with a pizza cutter and sprinkle extra sea salt lightly across the cracker sheet.
  7. Bake for about 15 minutes, or until they start to lightly brown.
  8. Cool for about 15 minutes and break apart into crackers. Store in a sealed container.

Roasted Tomato Soup

INGREDIENTS

2 lb organic Roma tomatoes
5 cloves garlic, unpeeled
5 tablespoons olive oil
1 teaspoon dried basil or italian seasoning
1 onion, finely chopped
1/4 teaspoon chili powder
2 tablespoons balsamic vinegar
2 teaspoons honey
4 cups organic vegetable stock, low sodium
1/4 cup chapped flat-leaf parsley, to serve

PREPARATION

1. Preheat the oven to 400 degrees. Halve the tomatoes and lay cut-side up in a baking tray with the garlic. Drizzle the olive oil and dried basil on top on the tomatoes. Roast for 30 minutes. Take the garlic out after 20 minutes if it is drying out.

2. Heat the extra oil in a heavy-based pan. Add the onion and chili powder, cook, covered for 10 minutes over medium heat, stirring frequently.

3. Chop the tomatoes and squeeze the garlic pulp from their skins. (You can throw the tomatoes and garlic to your food processor or vitamin to make a smoother soup.) Add to the pan along with the vinegar and honey. Cook, stirring together for 1 minute. Add the stock. Bring to a simmer, stirring occasionally for 5 minutes. Season to taste and add parsley.

Prep time: 20 min
Total cooking time: 1 hr 19 min
Serves 4-5

Summer Time Fun and Vegetable Omelet

I had the worlds best omelet over the 4th of July weekend in a little town called Kanab, right on the boarder of Arizona and Utah. Who would have thought?! After a weekend of camping in Zion National Park (one of the most beautiful places on earth!), my husband and our good friends stopped here for lunch.
A few pictures from Zion National Park, Utah.
Little did we know we were stopping right in the middle of the annual 4th of July town parade. This was a parade right out of an Andy Griffith show. The local’s were dressed up in their red, white and blue as they cheered the passing basketball team, cheerleaders, the fire department, and children pulling wagons full of candy and waterballons. There was even a miniature pony! (Li’l Sebastian!!!….Parks and Recreation anyone?!)
We finally found a small western themed diner to eat at where we could watch the parade from the window. Here we ordered breakfast for lunch (one of my favorite things to do!) When our orders arrived I was surprised to find that my Veggie Omelet was actually filled with veggies! (I find that most veggie omelets come with a couple of tomatoes and 2 lbs of cheese loaded on top). With each bite I took I found a new vegetable. First a carrot! (“a carrot with eggs! This is great!”), then a broccoli (“wow a broccoli!”), celery! zucchini! squash! With each bite I became more and more excited! Luckily, my dear friends know me well enough that they were not too surprised by my ecstatic reaction to finding vegetables in my omlete.
At that moment I knew that this dish was something I had to re-create at home. So here it is! Feel free to try other vegetables in your omelet and let me know how it turns out! Enjoy!

Summer Vegetable Omelet
(Feeds 4)

Ingredients
6 eggs, scrambled
1/4 cup, medium cheddar cheese (no dye)
1 carrot, chopped
1/2 cup of broccoli florets
1/2 cup of cauliflower florets
1/2 cup zuchinni, chopped, bite size
1/2 cup yellow squash, chopped, bit size
1/4 cup red onion, chopped
8 cherry tomatoes, cut in half
1/2 cup, green bell pepper, chopped
salt and pepper to taste

Directions
Heat large skillet over med-high heat with a bit of olive oil. Place all the vegetables in skillet for about ten minuets, or till they are tender, but not soft. Remove vegetables from pan. Scrape and remove any remaining veggies parts from pan. Add a bit more olive oil to pan, so eggs don’t stick. Add the scrambled eggs to the pan. Cook for 1 to 2 mins, until eggs are slightly cooked but still runny. Add the veggies to the eggs and carefully mix together. Lay the cheese on top of the omelet and place lid on pan for 2 mins, till cheese is melted. Remove omelet from pan and enjoy with a glass of fresh squeezed orange juice!